Skip to content

Raspberry-Pi

Raspberry Pi 4 testing USB Wireless

Raspberry Pi 4 USB Wireless dongles that work out-of-the-box

Tested on Raspberry Pi 4 with Linux version 5.10.59-v7l+

dmesg | grep "Machine model"
[    0.000000] OF: fdt: Machine model: Raspberry Pi 4 Model B Rev 1.1


cat /proc/version
Linux version 5.10.59-v7l+ (dom@buildbot) (arm-linux-gnueabihf-gcc-8 (Ubuntu/Linaro 8.4.0-3ubuntu1) 8.4.0, GNU ld (GNU Binutils for Ubuntu) 2.34) #1447 SMP Thu Aug 19 12:25:41 BST 2021

Hercules USB dongle - DID worked out-of-the-box

usb 1-1.3: new high-speed USB device number 3 using xhci_hcd
usb 1-1.3: New USB device found, idVendor=06f8, idProduct=e033, bcdDevice= 2.00
usb 1-1.3: New USB device strings: Mfr=1, Product=2, SerialNumber=3
usb 1-1.3: Product: 802.11n WLAN Adapter
usb 1-1.3: Manufacturer: Realtek
usb 1-1.3: SerialNumber: 00e04c000001
rtl8192cu: Chip version 0x10
rtl8192cu: Board Type 0
rtl_usb: rx_max_size 15360, rx_urb_num 8, in_ep 1
rtl8192cu: Loading firmware rtlwifi/rtl8192cufw_TMSC.bin
ieee80211 phy1: Selected rate control algorithm 'rtl_rc'
usbcore: registered new interface driver rtl8192cu
rtl8192cu: MAC auto ON okay!
rtl8192cu: Tx queue select: 0x05


lsusb  | grep Realtek
Bus 001 Device 003: ID 06f8:e033 Guillemot Corp. Hercules HWNUp-150 802.11n Wireless N Pico [Realtek RTL8188CUS]


lsusb -t

/:  Bus 01.Port 1: Dev 1, Class=root_hub, Driver=xhci_hcd/1p, 480M
    |__ Port 1: Dev 2, If 0, Class=Hub, Driver=hub/4p, 480M
        |__ Port 3: Dev 3, If 0, Class=Vendor Specific Class, Driver=rtl8192cu, 480M


iwconfig wlan1
wlan1     IEEE 802.11  ESSID:off/any
          Mode:Managed  Access Point: Not-Associated   Tx-Power=20 dBm
          Retry short limit:7   RTS thr=2347 B   Fragment thr:off
          Encryption key:off
          Power Management:off
usb 1-1.2: new high-speed USB device number 4 using xhci_hcd
usb 1-1.2: New USB device found, idVendor=2357, idProduct=012d, bcdDevice= 2.10
usb 1-1.2: New USB device strings: Mfr=1, Product=2, SerialNumber=3
usb 1-1.2: Product: 802.11ac NIC
usb 1-1.2: Manufacturer: Realtek
usb 1-1.2: SerialNumber: 123456


lsusb | grep TP
Bus 001 Device 004: ID 2357:012d TP-Link

lsusb -t

 Port 2: Dev 4, If 0, Class=Vendor Specific Class, Driver=, 480M


iwconfig
# show no new interface as it does not have drivers for it...

Wifi AC - did NOT work out-of-the-box

usb 1-1.1: USB disconnect, device number 5
usb 1-1.3: new high-speed USB device number 6 using xhci_hcd
usb 1-1.3: New USB device found, idVendor=0bda, idProduct=c811, bcdDevice= 2.00
usb 1-1.3: New USB device strings: Mfr=1, Product=2, SerialNumber=3
usb 1-1.3: Product: 802.11ac NIC
usb 1-1.3: Manufacturer: Realtek
usb 1-1.3: SerialNumber: 123456


lsusb
Bus 001 Device 006: ID 0bda:c811 Realtek Semiconductor Corp.

lsusb -t
 Port 3: Dev 6, If 0, Class=Vendor Specific Class, Driver=, 480M

 iwconfig
# show no new interface as it does not have drivers for it...

testing drivers - https://github.com/cilynx/rtl88x2bu

or follow these instructions https://thepihut.com/blogs/raspberry-pi-tutorials/how-to-setup-a-rtl881cu-usb-wifi-adapter-with-the-raspberry-pi-4

this didn't work for me...

sudo apt install git bc dkms

mkdir usb-wifi-drivers

cd usb-wifi-drivers

git clone https://github.com/whitebatman2/rtl8821CU

cd rtl8821CU


## edit Makefil and update/change for your Raspberry Pi

vim Makefile

look for section 

###################### Platform Related #######################

## update for your "Platform", example below for Raspberry Pi 4

CONFIG_PLATFORM_I386_PC = n
CONFIG_PLATFORM_ARM_RPI = y
CONFIG_PLATFORM_ARM_RPI3 = n

Happy learning

Antonio Feijao UK

Micro-SD cards write speed test

While copy the Raspberry Pi image into a couple of micro-sd cards using the method "setting up a headless raspberry pi" (link below),

source https://www.raspberrypi.org/documentation/computers/configuration.html#setting-up-a-headless-raspberry-pi

I noticed the different speeds writes betweek micro-sd cards, therefore, create this post to list their writing speed.


diskutil list

diskutil unmountDisk /dev/disk4


sudo dd bs=1m if=2021-05-07-raspios-buster-armhf-lite.img of=/dev/rdisk4 ; sync


touch /Volumes/boot/ssh

touch /Volumes/boot/wpa_supplicant.conf

#vim /Volumes/boot/wpa_supplicant.conf

cat <<EOF > /Volumes/boot/wpa_supplicant.conf
ctrl_interface=DIR=/var/run/wpa_supplicant GROUP=netdev
update_config=1
country=GB

network={
        scan_ssid=1
        ssid="MY_WIFI_NAME"
        psk="MY_WIFI_PASSWORD"
        proto=RSN
        key_mgmt=WPA-PSK
        pairwise=CCMP
        auth_alg=OPEN
}

EOF

cat /Volumes/boot/wpa_supplicant.conf

diskutil list

sudo diskutil eject /dev/rdisk4

micro-sd card write speed results

sd-card - Sandisk Extreme 32 GB, V30, [3] A1
1874853888 bytes transferred in 26.577356 secs (70543281 bytes/sec) - 70.54 MB/sec

sd-card - Lexar 1000x, 32 GB [3]
1874853888 bytes transferred in 40.834400 secs (45913590 bytes/sec) - 45.91 MB/sec

sd-card - Lexar 633x, 32 GB [1]
1874853888 bytes transferred in 105.653969 secs (17745229 bytes/sec) - 17.74 MB/sec

sd-card - ScanDisk Ultra, 16 GB, A1 (10)
1874853888 bytes transferred in 138.986259 secs (13489491 bytes/sec) - 13.48 MB/sec

sd-card - Sandisk Ultra, 64 GB, (10)
1874853888 bytes transferred in 258.922797 secs (7240976 bytes/sec) - 7.24 MB/sec


Happy learning

Antonio Feijao UK

Project Raspbery Pi running Router DHCP NAT Access Point DNS Block advertising VPN

Project-raspberry-pi-router-dhcp-nat-access-point-dns-block-ads-vpn.md

Please note:

This post is still in "WORK IN PROGRESS" mode..

USE AT YOUR OWN RESPONSABILITY


Download latest Raspeberry Pi OS version


Copy Raspberry Pi OS into micro-sd card

diskutil list

(...)
/dev/disk4 (external, physical):  <<<<------- THAT IS MY EXTERNAL MICRO-SD CARD
   #:                       TYPE NAME                    SIZE       IDENTIFIER
   0:     FDisk_partition_scheme                        *31.9 GB    disk4
   1:             Windows_FAT_32 boot                    46.0 MB    disk4s1
   2:                      Linux                         31.9 GB    disk4s2

````

Unmount the disk

```bash

diskutil unmountDisk /dev/disk4
  Unmount of all volumes on disk4 was successful

After extracting the image file from the Raspberry Pi OS zip file,
copy it using dd command into the SD-card disk.

Note the /dev/rdisk4/, rdisk is the "raw disk", this speeds up the copying.

You can check my other post about micro-sd writing speed test in here https://antonio.cloud/linux/raspberry-pi/micro-sd-card-write-speed-test/.

sudo dd bs=1m if=2021-05-07-raspios-buster-armhf-lite.img of=/dev/rdisk4; sync

1788+0 records in
1788+0 records out
1874853888 bytes transferred in 27.184011 secs (68968994 bytes/sec)

Enable SSH and Wifi without monitor on Raspberry Pi

While I have the micro-sd card in the laptop, I want the Raspberry Pi to have SSH Server enabled and conncet to a wifi (wireless) network.

enable ssh and add wpa_supplicant.conf config file

Remeber to update for your settings, update for your wifi name, password and country.

In priority, then highest wins.

touch /Volumes/boot/ssh

touch /Volumes/boot/wpa_supplicant.conf

#vim /Volumes/boot/wpa_supplicant.conf

cat <<EOF > /Volumes/boot/wpa_supplicant.conf
ctrl_interface=DIR=/var/run/wpa_supplicant GROUP=netdev
update_config=1
country=GB

network={
        scan_ssid=1
        priority=5
        ssid="MY_WIFI_NAME"
        psk="MY_WIFI_PASSWORD"
        proto=RSN
        key_mgmt=WPA-PSK
        pairwise=CCMP
        auth_alg=OPEN
}

network={
        scan_ssid=1
        priority=0
        ssid="MY_OTHER_WIFI_NAME"
        psk="MY_OTHER_WIFI_PASSWORD"
        proto=RSN
        key_mgmt=WPA-PSK
        pairwise=CCMP
        auth_alg=OPEN
}

EOF

additional extra Bonus step

disable IPv6

While in here, you can disable IPv6 for the Raspberry Pi.

add ipv6.disable=1 at the almost end of the file cmdline.txt , add it just before the ini=/.... script that will run on first boot.

vim /Volumes/boot/cmdline.txt

console=serial0,115200 console=tty1 root=PARTUUID=xxxxaxxxa-xx rootfstype=ext4 elevator=deadline fsck.repair=yes rootwait quiet ipv6.disable=1 init=/usr/lib/raspi-config/init_resize.sh
disable Bluetooth

and to disable Bluetooth, add the below to the end of config.txt file

vim /Volumes/boot/config.txt

# Disable Bluetooth
dtoverlay=disable-bt
unmountDisk

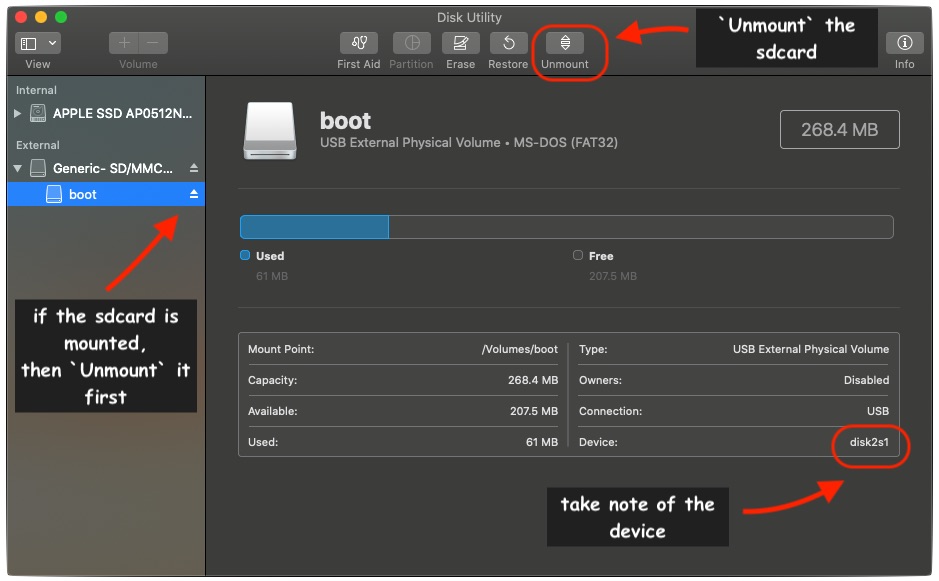
Then eject the "disk", the micro-sd card

diskutil eject /dev/disk4
  Disk /dev/disk4 ejected

Turn on your Raspberry PI connect via SSH and start the configurations

Insert the micro-sd card in the Raspberry Pi, turn the Raspberry Pi on and "look" for it on your router or look for a new device on your wifi (wireless) network.

Them, SSH into the Raspberry Pi and let the fun stuff (configurations) beggin!

I my case, I used nmap to find the new device on the network.

nmap -sT -p 22 --open 192.168.1.0/24

when you find your new device

ssh [email protected] <<--- IP of the new device, Raspberry Pi

Raspberry Pi default password if raspberry

1) As soon as you connect to the Raspberry Pi, change the default with sudo passwd pi command

sudo passwd pi

  New password:
  Retype new password:
  passwd: password updated successfully

2) Make sure your Raspberry Pi is up-to-date

sudo apt-get update
  (...)


sudo apt-get upgrade
  (...)

or shorter version if some extras

sudo su
#set +x

apt clean

apt update -y

apt full-upgrade -y

apt autoremove -y

apt install vim -y

add your favourite alias is you have some

 echo "alias ll='ls -alhF --group-directories-first --color=always'" >> /etc/bash.bashrc

 ```

Reboot and reconnect

3) Update the Raspberry Pi firmware (optional)

Update the Raspberry Pi firmware is option

```bash

sudo rpi-update

4) Use own Raspberry Pi config command

Review configurations and change what is meanful for you.

I recommend to give a name to the Raspberry Pi to meaninful.

sudo raspi-config

Reboot


Disable IPV6

(you can skip this steps if you did this on the "additional bonus step" mentioned above.)

https://www.raspberrypi.org/forums/viewtopic.php?t=256349

Add ipv6.disable=1 to the end of /boot/cmdline.txt file

Reboot


Disable Bluetooth

If you don't need Bluetooth, you can disable it and remove unnecessary files

config file

Edit the file /boot/config.txt and to the end the following

sudo vim /boot/config.txt

# Disable Bluetooth
dtoverlay=disable-bt

save and exit file

disable on systemctl

sudo systemctl disable hciuart.service
sudo systemctl disable bluealsa.service
sudo systemctl disable bluetooth.service

remove bluez files

apt purge bluez

Reboot


Install a second wifi devive

Just physically connect the additional external USB

additional drivers if required

Important

This is not the same for all the devices. You migh need to research the correct drivers for your specific device.

I followed these instructions - https://github.com/aircrack-ng/rtl8812au>

sudo apt-get install raspberrypi-kernel-headers

sudo apt install make gcc git

sudo apt install dkms

clone repository for driver rtl8812au

git clone -b v5.6.4.2 https://github.com/aircrack-ng/rtl8812au.git
cd rtl*

(....)

remaining instructions here - https://github.com/aircrack-ng/rtl8812au>


Setup one of the wireless devices as access Wireless Access Point

In this project I used the Raspberri Pi 4 onboard wireless as Access Point, device wlan0

  • wlan1 and eth0 will connect to the internet, eth0 gets priority

  • wlan0 will be the access point

for this, I used (and adopted to my setup) this guide https://www.raspberrypi.org/documentation/configuration/wireless/access-point-routed.md

sudo apt install hostapd

sudo systemctl unmask hostapd
sudo systemctl enable hostapd

sudo apt install dnsmasq

sudo apt install -y netfilter-persistent iptables-persistent

# sudo DEBIAN_FRONTEND=noninteractive apt install -y netfilter-persistent iptables-persistent

Wireless static IP for wlan0

Define the wireless interface IP configuration

sudo vim /etc/dhcpcd.conf

interface wlan0
    static ip_address=192.168.4.1/24
    nohook wpa_supplicant

Raspberry Pi with multiple wireless devices

Use one wpa_supplicant.conf file per device wlan0 and wlan1

ll /etc/wpa_supplicant/

-rwxr-xr-x  1 root root  937 Apr 16 14:07 action_wpa.sh*
-rw-r--r--  1 root root  25K Apr 16 14:07 functions.sh
-rwxr-xr-x  1 root root 4.6K Apr 16 14:07 ifupdown.sh*
-rw-------  1 root root  506 Aug 20 16:38 wpa_supplicant.conf
-rw-------  1 root root  496 Aug 20 16:37 wpa_supplicant-wlan0.conf
-rw-------  1 root root  477 Aug 20 16:35 wpa_supplicant-wlan1.conf

Enable wpa_supplicant service per device wlan0 and wlan1

systemctl enable [email protected]  
systemctl disable wpa_supplicant.service  

systemctl start [email protected]  
systemctl stop wpa_supplicant.service  

systemctl status [email protected]  
systemctl status wpa_supplicant.service  


systemctl | grep wpa
[email protected]        loaded active running   WPA supplicant daemon (interface-specific version)
[email protected]        loaded active running   WPA supplicant daemon (interface-specific version)
system-wpa_supplicant.slice         loaded active active    system-wpa_supplicant.slice

Persistent wifi wireless device

Raspberry Pi, randomly the onboard wireles device wlan0 becomed wlan1, below was a solution to keep the Raspberry Pi wlan0 and wlan1 persistent across reboots.

source and thank you to https://www.raspberrypi.org/forums/viewtopic.php?f=36&t=198946

cat /etc/udev/rules.d/72-wlan-geo-dependent.rules

# source
#      https://www.raspberrypi.org/forums/viewtopic.php?f=36&t=198946
#
##
#           +-----------------+
#           | 1-1.1.2 | 1-1.3 |
# +------+  +---------+-------+
# | eth0 |  | 1-1.1.3 | 1-1.2 |
# +------+  +-----------------+ (RPI USB ports with position dependent device names for up to 4 optional wifi dongles)
#
#
# | wlan0 | (onboard wifi)
#
ACTION=="add", SUBSYSTEM=="net", SUBSYSTEMS=="sdio", KERNELS=="mmc1:0001:1", NAME="wlan0"
ACTION=="add", SUBSYSTEM=="net", SUBSYSTEMS=="usb",  KERNELS=="1-1.1.2",     NAME="wlan1"
ACTION=="add", SUBSYSTEM=="net", SUBSYSTEMS=="usb",  KERNELS=="1-1.1.3",     NAME="wlan1"
ACTION=="add", SUBSYSTEM=="net", SUBSYSTEMS=="usb",  KERNELS=="1-1.3",       NAME="wlan1"
ACTION=="add", SUBSYSTEM=="net", SUBSYSTEMS=="usb",  KERNELS=="1-1.2",       NAME="wlan1"

# when using the lines below, only one WiFi device type can be used at a time
#ACTION=="add", SUBSYSTEM=="net", DRIVERS=="brcmfmac", NAME="wlan0"
#ACTION=="add", SUBSYSTEM=="net", DRIVERS=="rtl8192cu", NAME="wlan1"

Enable routing and IP masquerading

sudo vim /etc/sysctl.d/routed-ap.conf

# https://www.raspberrypi.org/documentation/configuration/wireless/access-point-routed.md
# Enable IPv4 routing
net.ipv4.ip_forward=1

"Mask" your Access point clients leaving your network.

Meaninig, mask the eth0 or wlan0 or whatever interface your Raspberry PI is connect to the internet side.

sudo iptables -t nat -A POSTROUTING -o wlan1 -j MASQUERADE
sudo iptables -t nat -A POSTROUTING -o eth0 -j MASQUERADE

sudo netfilter-persistent save


sudo cat /etc/iptables/rules.v4

Filtering rules are saved to the directory /etc/iptables/.

If in the future you change the configuration of your firewall, make sure to save the configuration before rebooting.


Configure the DHCP and DNS services for the wireless network

sudo mv /etc/dnsmasq.conf /etc/dnsmasq.conf.orig

sudo vim /etc/dnsmasq.conf


interface=wlan1
# Listening interface

dhcp-range=192.168.3.101,192.168.3.199,255.255.255.0,12h
# Pool of IP addresses served via DHCP

domain=wlan03
# Local wireless DNS domain

address=/gw.wlan03/192.168.3.1
# Alias for this router

To ensure WiFi radio is not blocked on your Raspberry Pi, execute the following command:

sudo rfkill unblock wlan

Configure the access point software

Create the hostapd configuration file, located at /etc/hostapd/hostapd.conf,
to add the various parameters for your new wireless network.

sudo vim /etc/hostapd/hostapd.conf

Add the information below to the configuration file.

country_code=GB

interface=wlan1
ssid=MYWIFI_AP_NAME

## for 2.4Ghz
#hw_mode=g
#channel=7

## for 5GHz
hw_mode=a
channel=36

macaddr_acl=0
auth_algs=1
ignore_broadcast_ssid=0

wpa=2
wpa_passphrase=MY_WIFI_AP_PASSWORD
wpa_key_mgmt=WPA-PSK

wpa_pairwise=TKIP
rsn_pairwise=CCMP

Note the line country_code=GB:

it configures the computer to use the correct wireless frequencies in the United Kingdom.

Adapt this line and specify the two-letter ISO code of your country. See Wikipedia for a list of two-letter ISO 3166-1 country codes.

To use the 5 GHz band, you can change the operations mode from hw_mode=g to hw_mode=a.

Possible values for hw_mode are:

a = IEEE 802.11a (5 GHz) (Raspberry Pi 3B+ onwards)
b = IEEE 802.11b (2.4 GHz)
g = IEEE 802.11g (2.4 GHz)

Note that when changing the hw_mode, you may need to also change the channel - see Wikipedia for a list of allowed combinations.

Setup up hostapd.conf for a specific interface

To avoid conflits with wlan0 and wlan1, I want the hostapd service to run only on the wlan0

cd /etc/hostapd/

sudo mv hostapd.conf wlan0.conf

systemctl | grep hostapd

sudo systemctl | grep wpa

sudo systemctl disable  [email protected]

sudo systemctl status  hostapd.service
sudo systemctl disable  hostapd.service

sudo systemctl stop hostapd.service

## here enable hostapd just on interface wlan0
sudo systemctl enable  [email protected]

ifconfig

sudo reboot

Run your new wireless access point

Now restart your Raspberry Pi and verify that the wireless access point becomes automatically available.

sudo systemctl reboot

Once your Raspberry Pi has restarted, search for wireless networks with your wireless client.

The network SSID you specified in file /etc/hostapd/hostapd.conf should now be present, and it should be accessible with the specified password.


set up DHCP local WIFI for primary WLAN

https://raspberrypi.stackexchange.com/questions/37920/how-do-i-set-up-networking-wifi-static-ip-address-on-raspbian-raspberry-pi-os/37921#use-different-wpa_supplicant-files

wlan0 <--- Is the onboard wireless device to be as Wireless Access Point

wlan1 <--- Is the additional USB wireless device that connects to the local wireless for internet access

eth0 ← if connected to local network, will also provide internet for the wireless users connects to the wireless access point on wlan1

ls -alhF /etc/wpa_supplicant/

  total 52K
  drwxr-xr-x  2 root root 4.0K Aug  2 09:19 ./
  drwxr-xr-x 82 root root 4.0K Aug  2 09:18 ../
  -rwxr-xr-x  1 root root  937 Apr 16 14:07 action_wpa.sh*
  -rw-r--r--  1 root root  25K Apr 16 14:07 functions.sh
  -rwxr-xr-x  1 root root 4.6K Apr 16 14:07 ifupdown.sh*
  -rw-r--r--  1 root root    0 Aug  2 09:19 wpa_supplicant.conf  <---- default wireless setup for all interfaces (I left this file empty)
  -rw-r--r--  1 root root  237 Aug  2 09:19 wpa_supplicant-wlan1.conf <------ this is the interface that I want the Raspberry Pi to use to connect to the wireless internet.

WORK-IN-PROGRESS

next to do


Happy learning

Antonio Feijao UK

Install and connect to a Raspberry Pi without monitor

The purpose of this post is to briefly show how to install the Raspberry Pi OS into a new microSD card using a laptop or desktop. Then boot the Raspberry Pi with this microSD card.

The Raspberry Pi will automatically connect to your wifi and the ssh tcp/22 service should be running, which will allow you to connect via ssh.

No need for a monitor to be connected to the Raspberry Pi.

Using the laptop or desktop, in the command line, the dd command will copy the Raspberry Pi OS into the microSD card.

After the dd command, 2 files need to be added to the /boot folder in the microSD card.

- One empty file named `ssh`

- One file named `wpa_supplicant.conf` with your wireless configuration

example for the wpa_supplicant.conf file

ctrl_interface=DIR=/var/run/wpa_supplicant GROUP=netdev
update_config=1
country=GB

network={
scan_ssid=1
ssid="MY_WIFI_NAME"
psk="MY_WIFI_PASSWORD"
}

Note

If you have multiple wlan interfaces, you can use one file per interface, for example wpa_supplicant-wlan1.conf


Step-by-step detail

Step 1 - Download

Step 2 - Unzip

Step 3 - Copy

  • Copy the Raspberry Pi OS into the microSD card.

  • Make sure there are no mount folders.

unmount micro sd card to install raspberry pi

IMPORTANT - the dd command will delete everything in the microSD card - make sure you know what you are doing! Otherwise, stop here or follow the official guidance here.

I am using the dd command.

sudo dd bs=1m if=path_of_your_image.img of=/dev/rdiskN; sync

  • Example of my dd command running
dd bs=1m if=2020-08-20-raspios-buster-armhf-lite.img of=/dev/rdisk2; sync
1760+0 records in
1760+0 records out
1845493760 bytes transferred in xxxxxxx secs (xxxxxxx bytes/sec)

Step 4 - add files into the boot folder

After the copy, the first partition in the microSD card is usually automatically mounted /boot.

Now, all I need to do is to copy the files that I already have on my laptop into this /boot folder.

I just have to drag-and-drop (or copy and paste) then into the /boot folder.

  • One empty file named ssh

    ssh

  • One file named wpa_supplicant.conf with your wireless configuration

country=GB
ctrl_interface=DIR=/var/run/wpa_supplicant GROUP=netdev
update_config=1

network={
scan_ssid=1
ssid="MY_WIFI_NAME"
psk="MY_WIFI_PASSWORD"
}

if you cannot copy the files, why not use the command line?

cd /Volumes/boot

touch ssh

vim wpa_supplicant.conf << and add the content in here

Power on Raspberry PI Conclusion

And that's it :)

Now, eject the microSD card from your laptop, put it in the Raspberry Pi and on boot the Raspberry Pi, it should connect to your wifi.

To connect via ssh you need to find the ip address that was allocated to the Raspberry Pi.

Usually, you can easily find the ip address in your home router connected devices.

Alternativelly, if you have nmap installed your your laptop (or on another Raspberry Pi), you can scan your network for devices with tcp/ssh port 22 open.

example for the nmap command


{% highlight bash %}

searching for new device on local network

nmap -sT -p22 --open 192.168.1.0/24 # ( CHANGE FOR YOUR OWN SUBNET)

(...) Nmap scan report for raspberrypi.home.local (192.168.1.238)
Host is up (0.042s latency). (...)

Connect to raspberrypi.home.local

ssh [email protected]

default username pi default password rasbperry

Change pi default password

pi@raspberrypi:~ $ sudo passwd pi New password: Retype new password: passwd: password updated successfully

Update and configure for your needs

pi@raspberrypi:~ $ sudo raspi-config

{% endhighlight %}

sudo-raspi-config.png

For example, change hostname, update config for your needs, check my other post on category raspberry-pi


Happy learning,

Antonio.Cloud

raspberry-pi-as-a-router-nat

Transform to run as a router and NAT device

Finally! This project is now documented here - https://antonio.cloud/projects/linux/raspberry-pi/raspberry-pi-router-access-point-dns-block-ads-vpn/

Important

Below are notes from my old post

## the command below required sudo

echo "-----------------------"
echo "Shows the configs before changes..."

sysctl net.ipv4.ip_forward net.ipv4.conf.eth0.send_redirects

iptables -n -t nat -L POSTROUTING 


echo "-----------------------"
echo "Enabling IPv4 routing packets forward..."

sysctl -q -w net.ipv4.ip_forward=1 net.ipv4.conf.eth0.send_redirects=0


echo "-----------------------"
echo "Enabling routing/PAT with ip tables..."

iptables -t nat -C POSTROUTING -o eth0 -j MASQUERADE 2> /dev/null || iptables -t nat -A POSTROUTING -o eth0 -j MASQUERADE


echo "-----------------------" 
echo "Show configs after changes..."
sysctl net.ipv4.ip_forward net.ipv4.conf.eth0.send_redirects
iptables -n -t nat -L POSTROUTING 


echo "-----------------------"
echo "Routing/NAT configuration completed "

raspberry-pi-camera-resolution

Linux command lsusb

lsusb | grep -i cam

Bus 001 Device 004: ID 046d:0825 Logitech, Inc. Webcam C270
  • Now, use the Bus and Device numbers with -v option for verbose and filter for "Width|Height" and grep command.
$ lsusb -s 001:002 -v | egrep "Width|Height"

    wWidth    640
    wHeight   480
    wWidth    1280
    wHeight   1024
...

lsusb with sort awk grep uniq

I also like to use command likes sort, awk, grep and uniq.

echo "Maximum --> Width <-- will come on top" && lsusb -s 001:004 -v | grep "Width"  | awk '{print $2 " " $1}' | sort | uniq | sort -nr


echo "Maximum --> Height <-- will come on top" && lsusb -s 001:004 -v | grep "Height"  | awk '{print $2 " " $1}' | sort | uniq | sort -nr

v4l2-ctl

  • or another elegant option if available to you is :

v4l2-ctl --list-formats-ext

some credits go to

https://askubuntu.com/questions/214977/how-can-i-find-out-the-supported-webcam-resolutions

raspberry-pi-swap-memory

Raspberry Pi increase the swap memory size

  • First edit the swap configuration file

Change the size for your preference, Default is 100, (100MB)

Change for example for 2048 (2GB)

sudo vim /etc/dphys-swapfile

  • Second, restart the service

sudo /etc/init.d/dphys-swapfile restart

  • Confirm

Default swap file location is ls -lh /var/swap

-rw------- 1 root root 2.0G Feb 29 20:20 /var/swap

  • HTOP - you can also confirm with htop to see memory, cpu and swap usage.

If you do not have htop installed, you can install it with apt-get install htop

raspberry-pi-stranger-things-alphabet-wall-lights

Stranger Things Alphabet Wall Lights with Raspberry Pi Python 3 and Neopixels

It all started with the launch of Stranger Things Season 3.

We, Kat Decided to invite a couple of friend for the first episode of ST Session 3 and why not create some scary wall that spells out some words?!

Why not, right?

Proof of Concept

What I used:

  • 1x Raspberry PI 3b+ with power supply
  • 1x Pack of 50 addressable RGB LEDs from Amazon - (LINKS)[LINKS]
  • 1x Power supply 5V for the Raspberry PI
  • 1x Power supply 5v for the LEDs
  • 1x breadboard with a couple electric cables

(...)